
When developing websites there are a few situations where you might need to modify your local Host file.
You might be building a website locally and want to use a custom local domain name instead of just an ip address or localhost.
You can use your hosts file to point internal-only domain names to your local web server, or a virtual machine.
Maybe you’re moving a domain to a different server and want to make sure everything is setup and working as expected before you start serving public traffic to it.
You can use your hosts file to point real domains to another server whether that server is running on your computer, on a local network, or elsewhere on the internet. This is useful for testing an application as if it's already in production.
Or perhaps you’re responsible for reviewing a new website before it launches. The rest of the world needs to continue seeing the old site until its ready, but you need a way for just your local computer to access the new version of the site when you type in the domain name.
Your computer’s host file can help with all that.
The host file is a way to override the normal DNS lookup process your browser uses to find internet addresses. This gives you the ability to map a domain name to whatever ip address you need.
How does a Hosts file work?
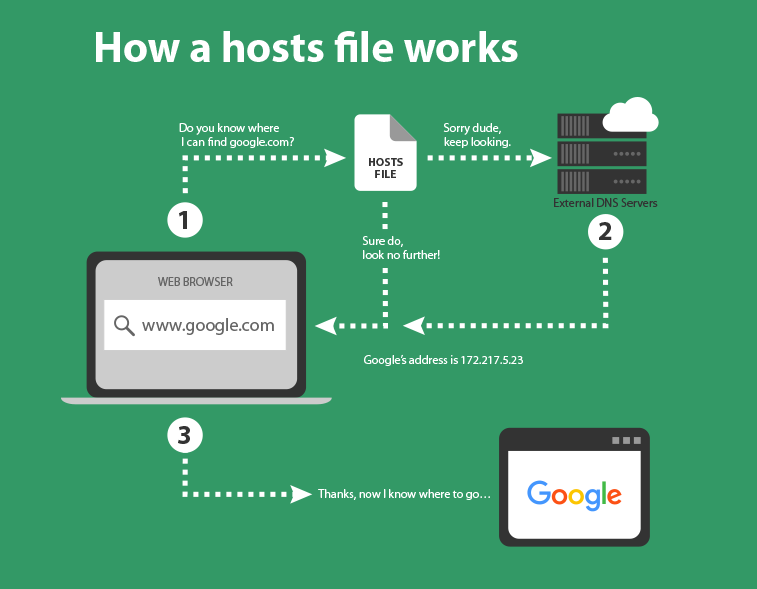
Suppose you want to visit a a certain web page. You just type the domain name into a browser and hit Enter.
What happens behind the scene is that your browser starts a lookup search to find the address of the server hosting the web page you're looking for. That request starts at your local computer’s Hosts file, if a domain and matching ip address aren’t found there, then the request goes out to external DNS servers until the address is found and returned back to your browser which it can then use to serve up the web page you want to view.
Cool
So now that we know that the browser will use the information it finds the local Hosts file before looking to external DNS sources, we can use our local Hosts file to point any domain name we want to any ip address we want.
So lets do it.
Modifying the Hosts file on a Mac
On a Mac you need to open a Terminal window and type the following to begin editing your Hosts file:
sudo nano /etc/hostsYou’ll likely need to enter your users password, and then you’ll be able to edit your hosts file.
Use your arrow keys on the keyboard to move the cursor down to the end of the file, (control v works too).
Once your cursor is at the bottom of the list you can add your custom domain entry like so:
After you’re done editing control x to save, choose Y when prompted and that’s it you should now be able to view that domain in a browser and have it bring up the ip address you entered in your local hosts file.
Modifying the Hosts file on a PC
On a PC we’ll modify the host file directly using notepad.
From the windows key use the search box and search for "Notepad".
Notepad should appear in the search results, right-click on Notepad and choose "Run as Administrator"
Click File > Open (or control + O) the following file: c:\Windows\System32\drivers\etc\hosts
(You may need to ensure "all files" is selected to see hosts appear in the list of options)
Now you can add your custom ip address and domain to the list and save the file by clicking File > Save (or control + S) then close the file and open the domain in a browser.
These changes will only work on the computer whose hosts file you edited.
Browser and DNS cache
If it didn’t work for any reason there is a solid chance it’s your browsers cache. Particularly if you are attempting to add a domain name to the hosts file that you have already visited. For instance if you’re trying to point an existing domain to a different ip address to test a new version of a website.
If this is the case it’s an easy fix by clearing your browser’s cache and trying the address again.
An easy way to confirm that browser cache is the issue is by loading the domain in a browser that you typically don’t use. If it comes up fine in that browser than you need to clear your cache in the browser that’s not working.
Using .dev for local web development no longer works
So our go-to internal naming convention for a long time was to use local.example.dev, that is until all of a sudden .dev didn't work anymore...
The problem is that most modern browsers like Chrome and Firefox will attempt to force HTTPS on publically available top level domains and since 2014 .dev is a publically available tld.
This means that unless you setup HTTPS on your local server .dev sites won’t work as expected.
An easy solution?
Use a protected top level domain for your local development naming conventions. There are a number of protected tld’s that will never be public and thus are safe for internal use. The most common ones for development are .local, .test, .example.
We prefer .local for our in-house development now.
Vagrant development
We use Virtualbox and Vagrant a lot to develop our LAMP websites locally. It’s nice because we can use an Ansible playbook to set up consistent production and local environments that are exactly the same.
Vagrant also comes with a great plugin called hostsupdater. That will add/remove custom entries in your hosts file for you so you don’t have to do it manually. When you vagrant up the entries are added to your hosts file and when you vagrant halt they’re removed. This keeps your hosts file clean and free of unnecessary or unused entries.
Adding it to your Vagrant workflow is simple, first install the plugin:
vagrant plugin install vagrant-hostsupdater
And then update your Vagrantfile like so:
# If a hostsfile manager plugin is installed, add all server names as aliases.
#aliases = get_vhost_aliases(vconfig) - [config.vm.hostname]
if Vagrant.has_plugin?('vagrant-hostsupdater')
config.hostsupdater.aliases = [www.freshjones.com]
end
You’ll need to ensure your VM has a hostname and is using a private network
config.vm.hostname = "app.freshjones.local"
config.vm.network :private_network, ip: "192.168.33.10"
That’s it, vagrant up and your host file will have been modified to include your aliases. Vagrant halt and they’ll be removed.
Alternative options to editing a hosts file
If modifying the hosts file to override DNS settings isn’t your thing there are other alternative methods for achieving the same results.
Xip.io and .localtest.me are services which acts like your hosts file. The service allows you to specify a local IP address and the xip.io domain will resolve to that address for you without needing to adjust your hosts file.
For instance we could enter 192.168.33.10.xip.io into a browser and it will resolve to our virtual machine running on 192.168.33.10.
You would still need to update the virtual host on the server to understand requests coming from xip.io.
If you’re on a Mac there is GasMask which is a hosts file manager, allowing you do manage your hosts file from a GUI instead of just through the terminal.
There are also browser plugins like Virtual Hosts which do the same thing as the host file does, but you can manage everything through the browser plugin without the hassle of having to alter the hosts files directly.
Conclusion
The hosts file is a great tool for developing websites. We don't need to pay for a custom domain or run a DNS server. We don’t need to setup any staging domains or pray that when we go live our server configuration is set up properly.
We can simply edit the hosts file on our local machine and build, test and preview our websites using whatever domain name or ip address we need.